


Improved user experience and security protocols are being introduced for the QuickBooks® Desktop software user by requiring the Company owner to log in to an Intuit® account when opening the Company file. Having an Intuit account provides a secure, single source login for access to all of Intuit’s powerful offerings, including owned QuickBooks Desktop software and connected services.
accountant advice
Intuit account – Why now for QuickBooks Desktop?
QuickBooks Desktop Company file
Admin Company file login. Let’s start with what we are familiar with: the Admin login for a QuickBooks Company file. The Admin is the default user when a new QuickBooks Desktop Company file is created. The Admin user has full rights to give other users access and permissions to work in the QuickBooks Company file.
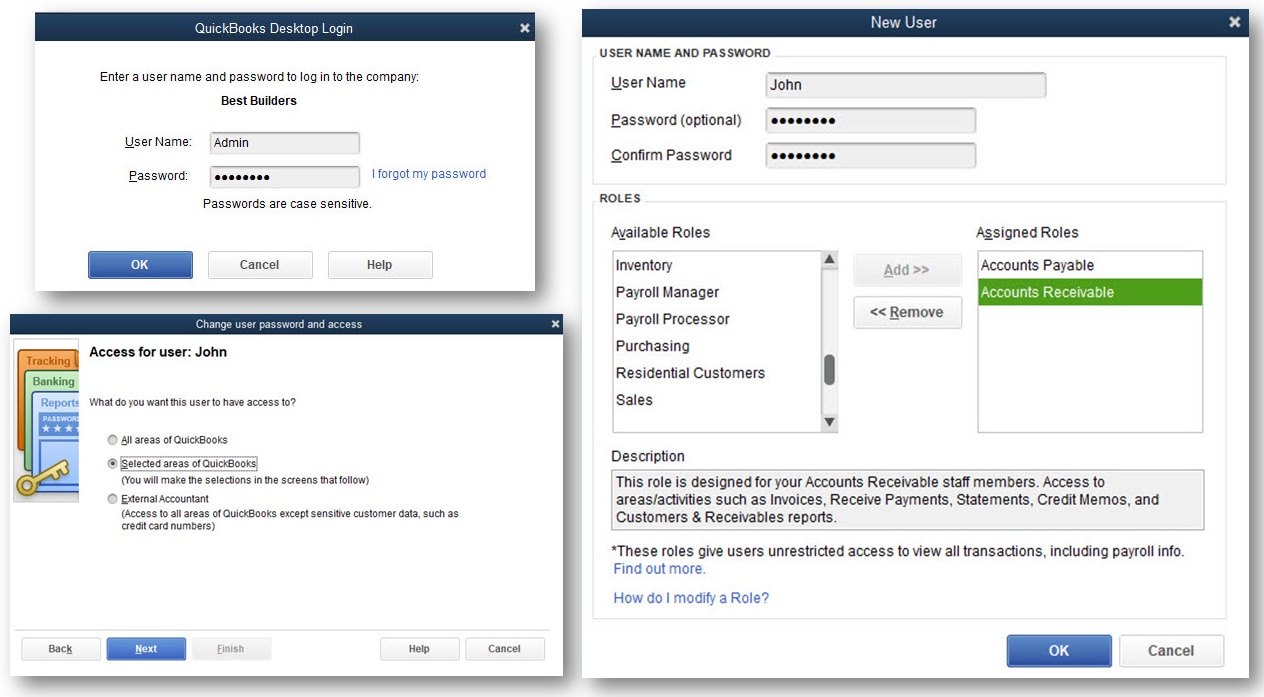
Restrict Admin Company file login. When it comes to accessing the QuickBooks Company file, the Admin user login should be restricted to the individual(s) responsible for adding other users, and granting them specific permissions while working in the file.
Recommend each user have their own Company file login. All too often, the Admin user login credentials are shared among multiple users who all access the same Company file. Excellent security controls for a QuickBooks Company file login would dictate that each user have their own login credentials and not share the Admin user login details. Of particular importance is the Audit Trail that assigns the name of the user to added or modified transactions.
QuickBooks users have recognized the importance of the Admin login for the Company file. Next, let’s discuss what an Intuit account is and why it is now being required for QuickBooks Desktop users.
Intuit account
Definition: What is an Intuit account? Think of it this way: On your mobile device, you create a pin or passcode to secure access to using the mobile device. Separately, you enter additional user credentials to access app functions on your mobile device, making the app functions and mobile device more secure.
Similarly, login to the QuickBooks Company file gives you access to basic QuickBooks features, such as creating an invoice or paying a bill. Separately, signing into your Intuit account will provide you additional access to all Intuit services, including QuickBooks Payments, Payroll direct deposit, Payroll Workforce, QuickBooks by TSheets time tracking, Receipt Management (new for QuickBooks 2021), and more.
Same Intuit account User ID and passwords can be used to manage your assets and connected services across all of the Intuit offerings you use.
Benefit: There is now an added level of security when managing access and permissions to QuickBooks Desktop and connected services. An Intuit account provides a platform to control users’ access to all your Intuit connected services without granting access to the QuickBooks Company file.
Requirement: Currently, QuickBooks Desktop users will find an Intuit account is mandated for the following scenarios:
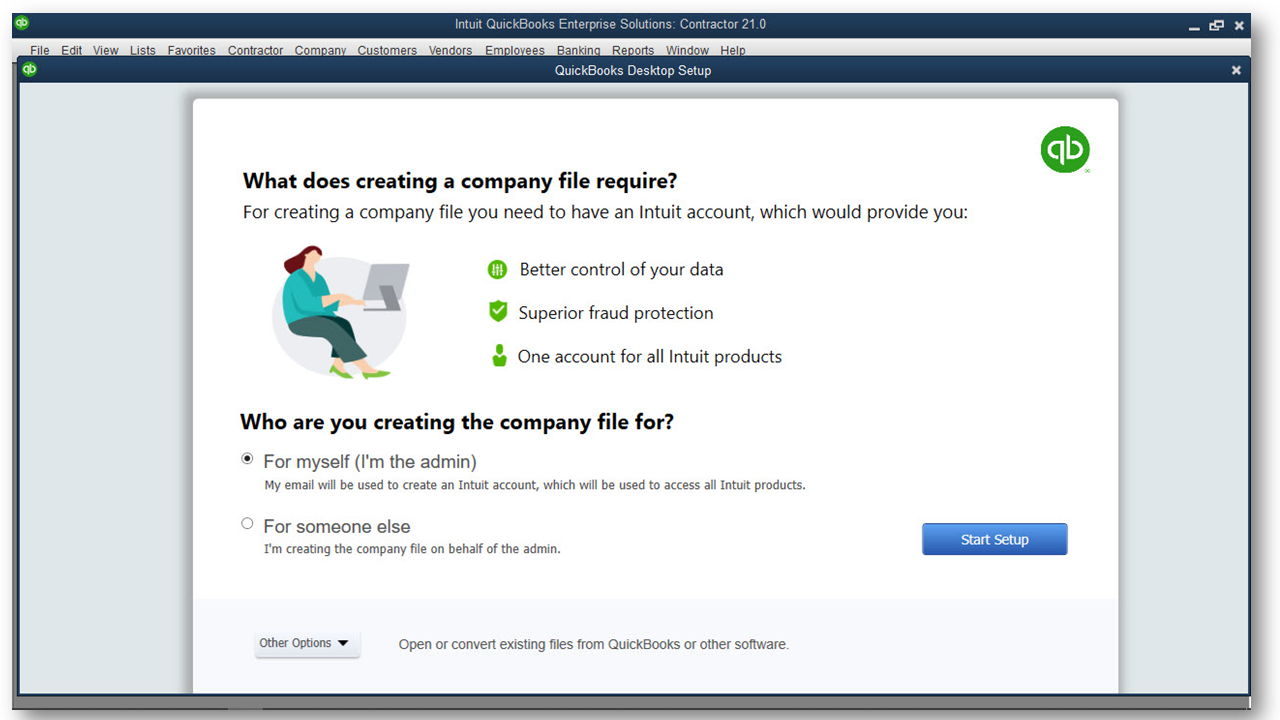
- When a new QuickBooks Company file is created.
- For QuickBooks Desktop users with the following connected services: Payments, Payroll direct deposit, TSheets time tracking, Payroll Workforce, Receipt Management (new for QuickBooks 2021), and more to come.
- ACT QUICKLY! When an existing QuickBooks Desktop Company file is opened using the Admin credentials, and no Intuit account is associated with the file, the QuickBooks user will be prompted to login or create an Intuit account. Pro and Premier users may choose to delay this action for up to 28 days and QuickBooks Enterprise users up to 42.
Intuit account step-by-step
Click below to watch a short video of the process.

Associate an Intuit account to a QuickBooks Desktop Company file
Step 1: User (matching the criteria below), logs into the QuickBooks Desktop Company file with the Admin credentials:
- Individual who owns/operates and manages all of the financial actions for the Company.
- Manages users and their permissions for accessing the QuickBooks Desktop Company file.
Step 2: Having logged into the QuickBooks Desktop Company file with the Admin user credentials, the Intuit account window displays the following prompt:
- You’re the admin: Choose this option if you are the individual who met the credentials listed in step 1. Enter the email you have or want to associate with the Intuit account for this QuickBooks Desktop Company file. Skip to step 3 below.
- You’re not the admin: As defined above, but you are logging into the file with a shared Admin user credential. QuickBooks closes the Intuit account prompt and will remind you again in 7 days.
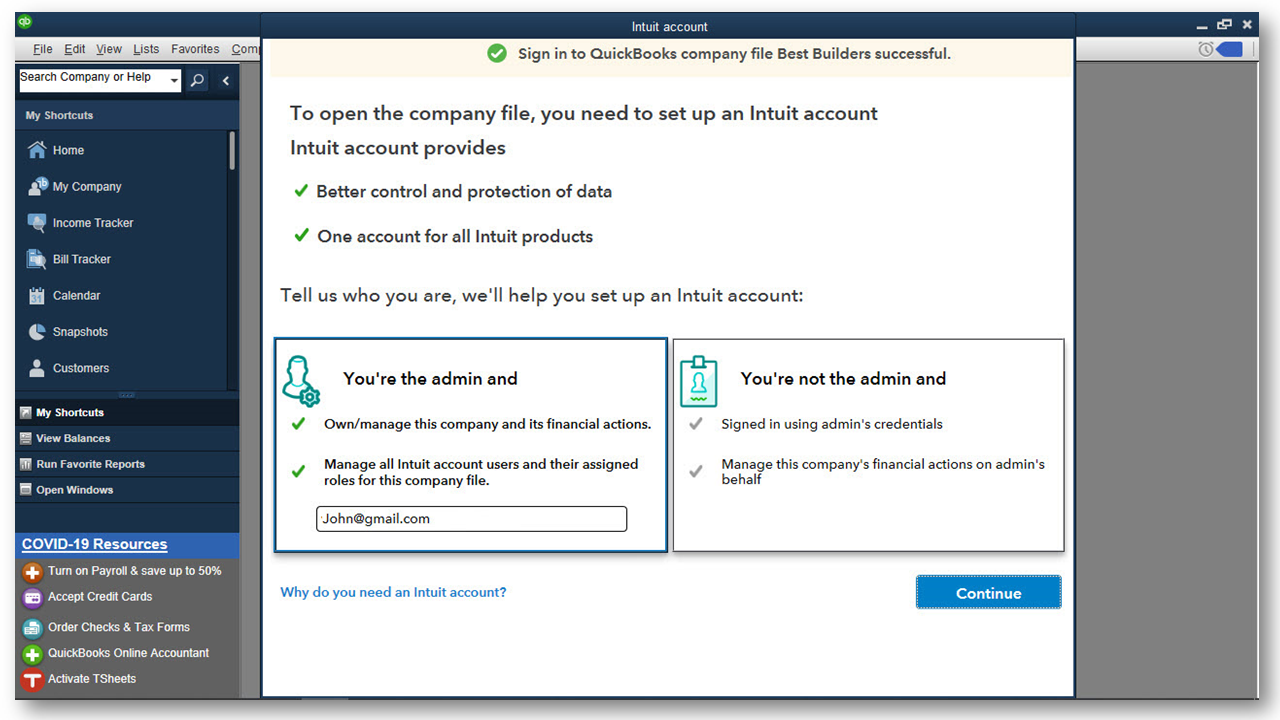
Step 3: If you selected You’re the admin, the Intuit account Sign in window displays, pre-filled with the email entered on the previous window. If you already have an Intuit account for this email, enter the password. Skip to step 6.
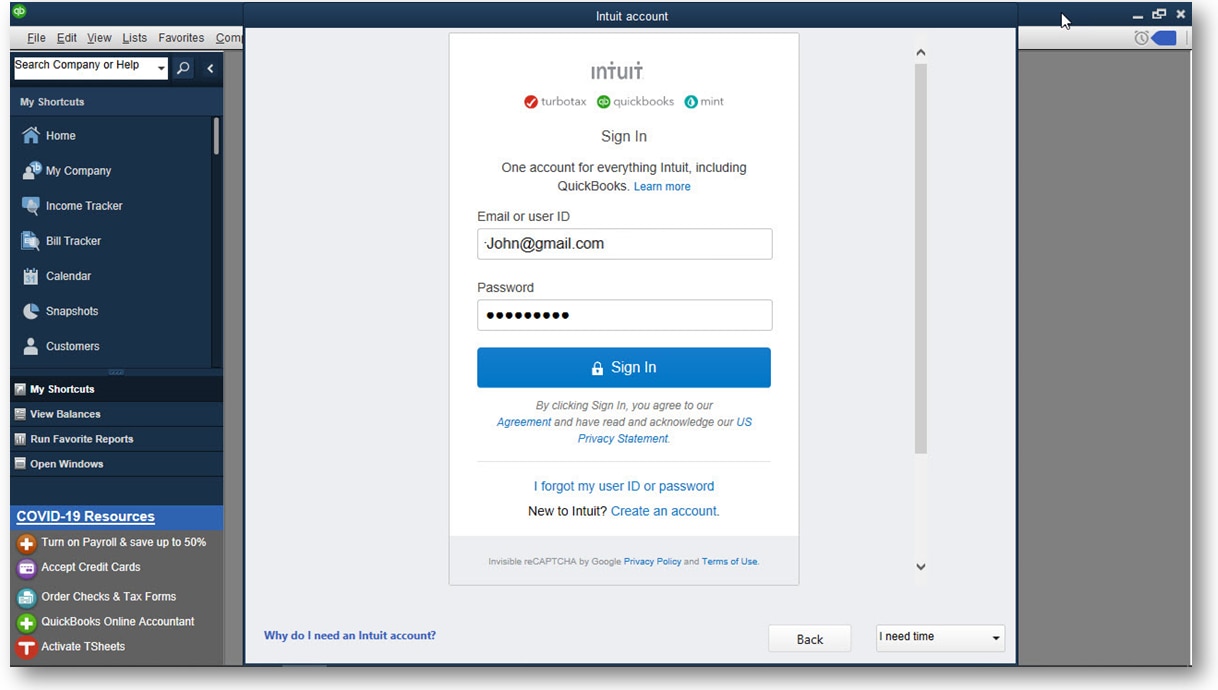
Step 4: If you do not have an Intuit account for this email, click Create an account in the lower part of the displayed window.
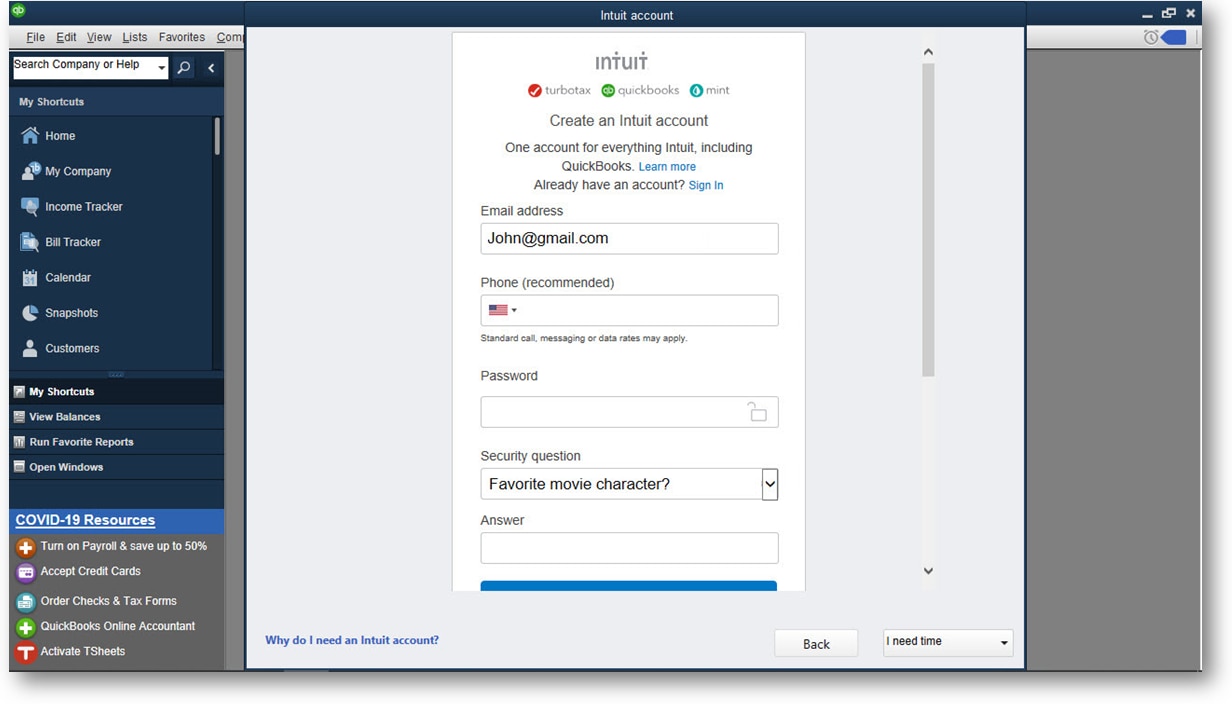
Step 5: Follow the prompts to create a new Intuit account. Be certain to use an email and phone credentials to which you have access. When logging into your Intuit account you may be prompted to verify your identity with multi-factor authentication.
Step 6: The Intuit account window closes after you successfully login to your existing Intuit account or newly-created Intuit account. This account login is now considered the Primary Admin for the Intuit account.
Note: Save your Intuit account Primary Admin credentials. The QuickBooks Desktop file will require that you log back into the Intuit account, detailed in the steps above, every 180 days.
Invite additional Intuit account users and assign roles
Note: This invitation does not give the user access to the QuickBooks Desktop Company file; instead it gives them access to selected connected services in use by the QuickBooks Company file.
Step 1: Log into the QuickBooks Desktop Company file with the QuickBooks Company file Admin user credentials.
Step 2: From the menu bar, select Company > Users > Intuit Account User Management.
Step 3: The Intuit account user management dashboard displays. The Users tab displays details about the Primary Admin and lists any invited users.
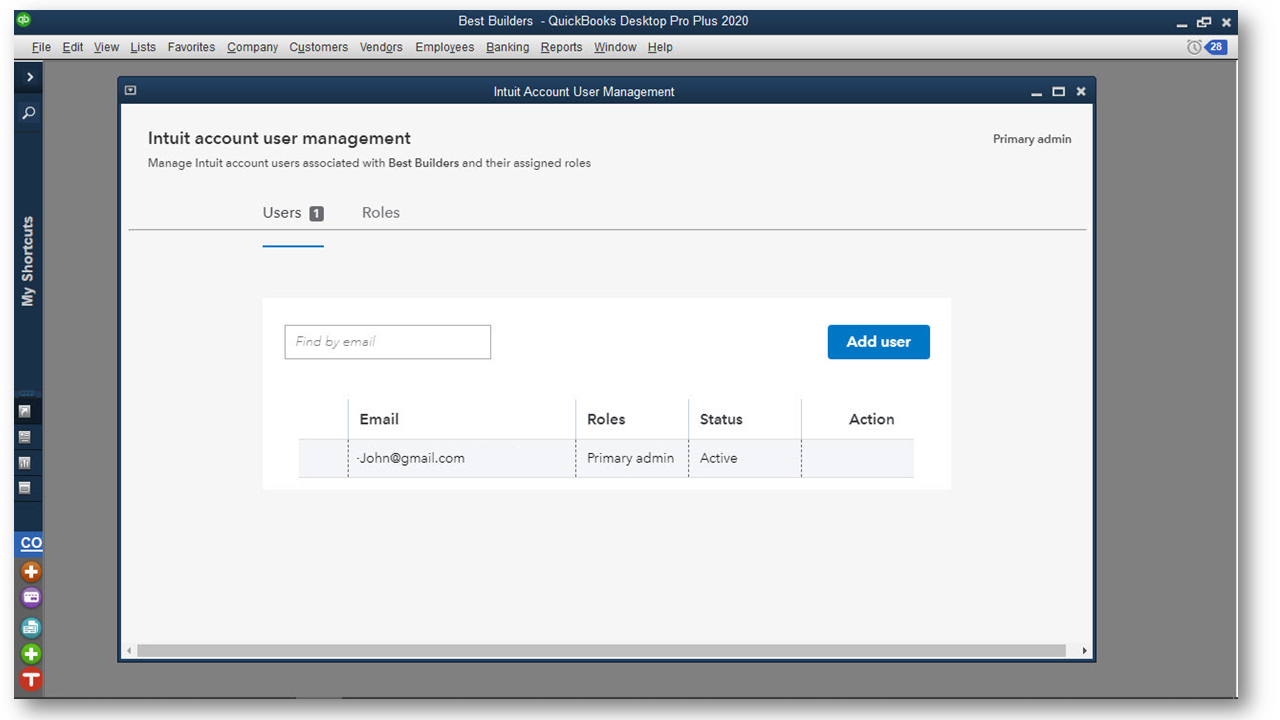
Step 4: Optionally, click the Roles tab to preview the description of the Roles offered, so you can decide the best role to assign to a new user. By default, every user added to the Intuit account is considered a “Basic user” in addition to any other roles selected.
Step 5: From the Users tab, select the Add User.
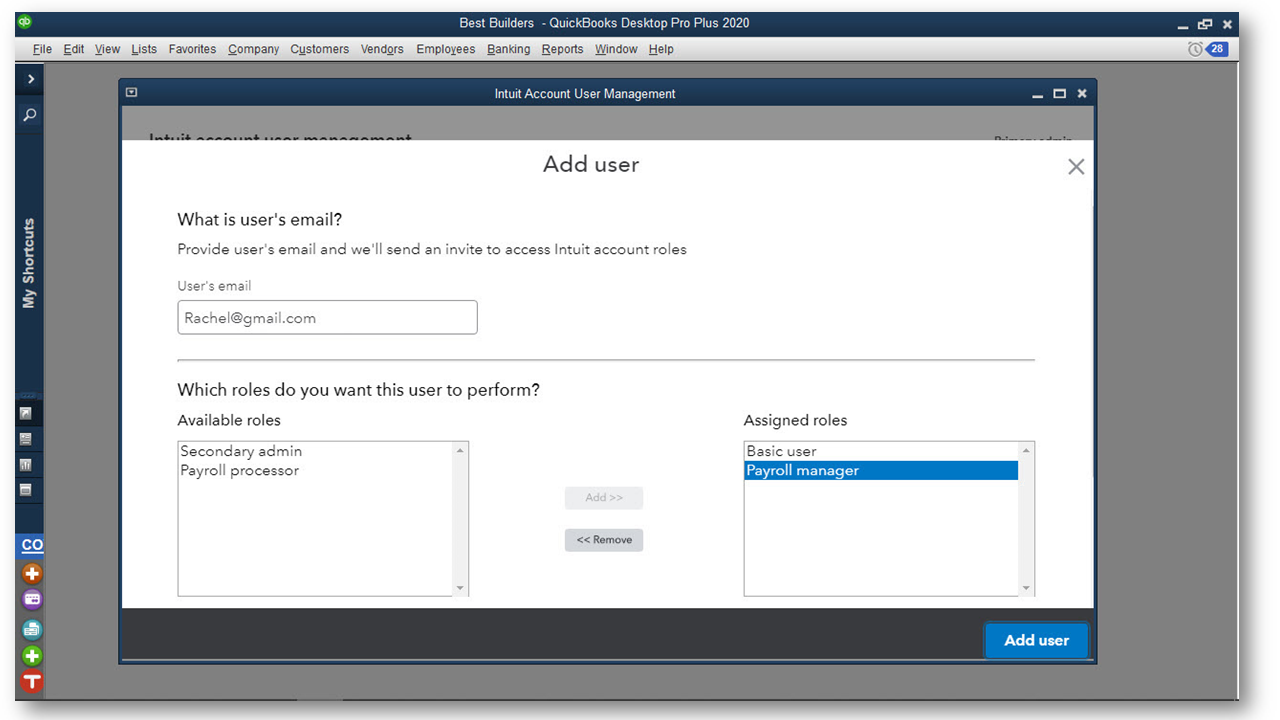
Step 6: Type the User’s email. Select from the Available roles (subject to change as more connected services are offered) and click Add in between the Available Roles and Assigned Roles. Then, click Add user. For added security, the invited user will be required to accept the invitation from his/her email within 30 days.
Step 7: QuickBooks displays a message that an invite was sent detailing the role(s) assigned and the QuickBooks Desktop Company file name. Click OK to close the message.
Step 8: The Intuit account User Management dashboard shows the added user(s) with a status of Pending.
Note: The same Intuit account user management dashboard can be accessed online by clicking here.
Invited User accepts email invitation to join Intuit account
Note: this invitation does not give the user access to the QuickBooks Desktop Company file, but instead gives the user access to selected connected services in use by the QuickBooks Company file.
Step 1: Invited user opens the email invitation. Subject line will read similar to “You’ve been invited to ….”
Step 2: Invited user, who has 30 days to accept the invitation, clicks the Accept invite button in the email. The Intuit account Primary Admin can resend the invite if needed.
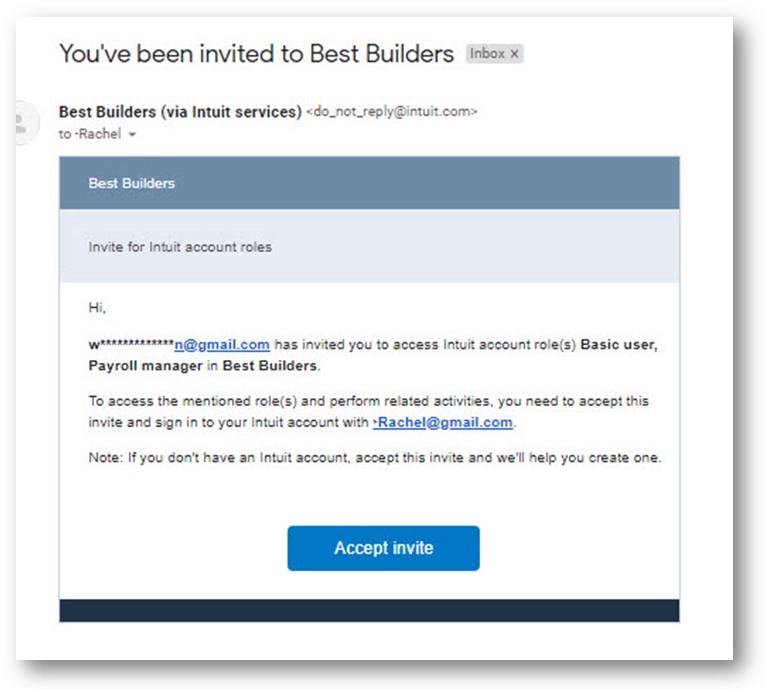
Step 3: Invited user will be directed to the Sign In window to create (or sign into) their own Intuit account. If creating a new Intuit account, the invited user should use an email and phone credentials to which they have access.
Step 4: To complete the login to their Intuit account, the invited user will select a method to verify their identity and then will be prompted to type the 6-digit code. Then click Continue.
Step 5: A Success! Message displays, click Continue to <Company Name>, the Company that generated the invite.
Step 6: Invite accepted message displays. Click OK.
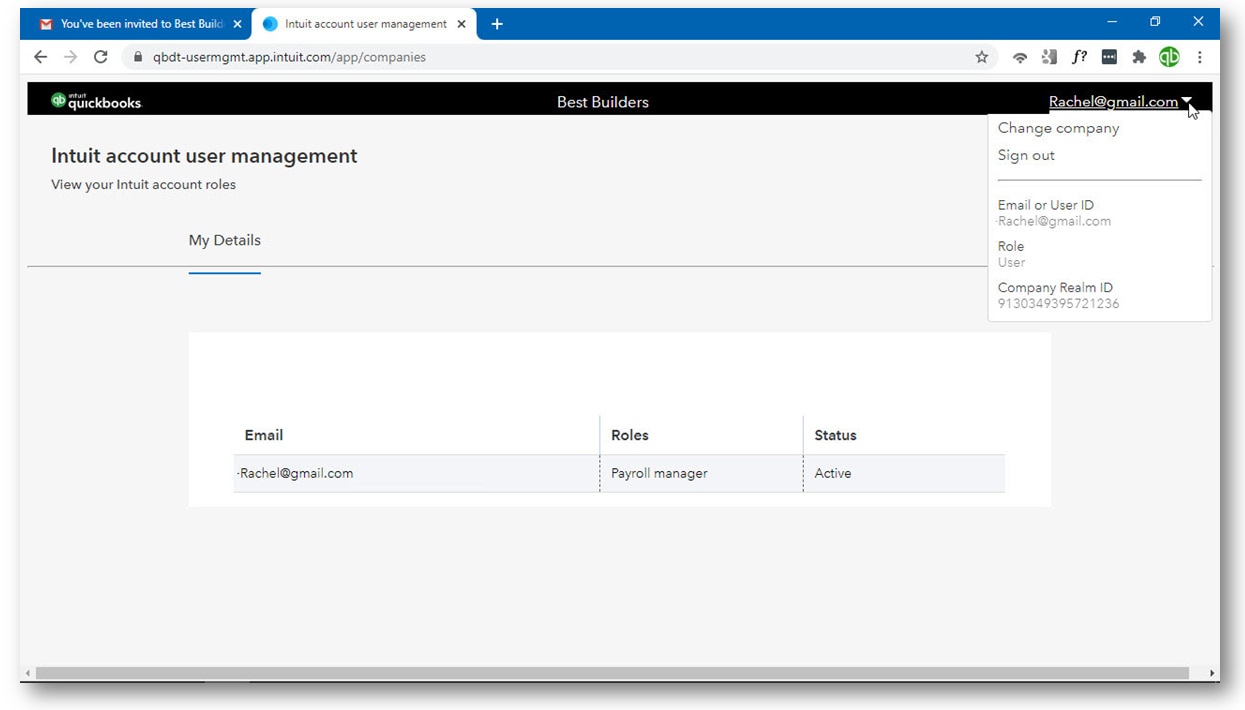
Step 7: Intuit account for the invited user displays listing his or her role(s).
Step 8: Intuit account user can click the drop-down next to their email address in the top right corner to Sign out, view the Email or User ID, and view the Company Realm ID.
Step 9: The user is now successfully invited to the named company and can use connected services for the QuickBooks Desktop company file, such as the new QuickBooks 2021 feature, Receipt Management.
Manage invited Intuit account users and roles
Note: This management is simply controlling access to connected services for a QuickBooks Desktop Company file and is not managing a user’s access or permissions in the QuickBooks Company file.
Step 1: User (meeting the below criteria), logs into the QuickBooks Desktop Company file with the Admin credentials:
- Individual who owns/operates and manages all of the financial actions for the Company.
- Adds users and assigns permissions for accessing the QuickBooks Desktop Company file.
Step 2: If 180 days have passed, you may be prompted to login again to the Intuit account as the Primary Admin.
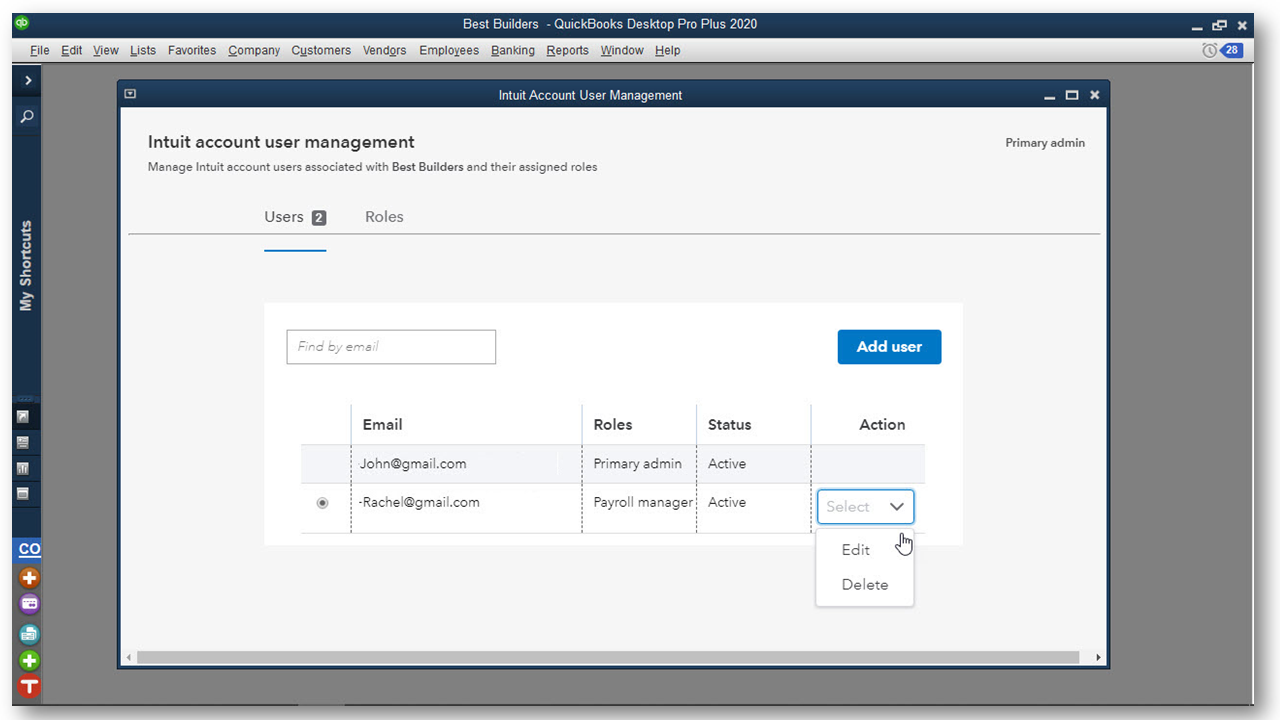
Step 3: From the menu bar, select Company > Users > Intuit Account User Management. The window will display Primary admin in the top right.
Step 4: Click the radio button next to the Email/User name to select that user. To the right of the selected user click the drop-down menu and choose to Edit or Delete the selected User. When editing a user, roles can be added or removed. When deleting, a user’s privilege to access connected service(s) is removed.
Note: The same Intuit account user management dashboard can be accessed online by clicking here.
Summary
This article has covered a lot of details. Let’s summarize:
QuickBooks Desktop Admin User: Grants access and permissions for other users to access the QuickBooks Desktop Company file.
Intuit Account Primary Admin User: Grants access and permission to the QuickBooks Company file connected services, for example, to Payments, Payroll direct deposit, TSheets time tracking, Payroll Workforce, Receipt Management (new for QuickBooks 2021), and more to come. Manage in QuickBooks Desktop from the menu bar: select Company > Users > Intuit Account User Management. Alternately, manage Intuit account users’ access and roles online.
You can have multiple Intuit account IDs, but the best experience is: the QuickBooks Desktop Company file Admin user is also the owner of the Intuit account Primary Admin, and this account is also associated with the Customer Account Maintenance Portal.
Related Articles


Get the latest to your inbox
No ThanksLooking for something else?
Call Sales: 1-877-683-3280